Monday, 23 January 2012 0 comments

Physics and Texture editors

I have been pretty content with my journey into game development by using a static image and then applying transitions or even x and y movements on every frame per second.

Soon, however, when the game starts taking shape you appreciate that it all looks very lifeless and therefore animation is required. To be honest I was pretty reluctant to get involved in sprites given that I am a one man indie shop but thought it were necessary. I won't bore you with my creative processes (I'll save that for another blog) but what I will comment on are the excellent tools that I am using to help.

First, the ones that I'm not. I am using Flash for my creative so the obvious choice would have been to go down the Spriteloq route but I decided I didn't want to be beholden to Flash in the future. Equally, despite its following, zwoptexapp I found a little dated and the optimisation around stylesheets wasn't as impressive as my chosen route.

Instead, I went for PhysicsEditor and TexturePacker. With my limited, but expanding, knowledge these tools have been invaluable to my productivity.

Lets start with PhysicsEditor. When starting off with Corona SDK I was a little intimidated by the way a collision shape was defined. Multiple vertices applied by positive and negative offsets for some reason didn't sit well with me. Even the simplest of shapes seem to take a while to set up as well as tweak.
When it came to complex shapes I found myself simplifying the shape to avoid the proper collision properties which of course diminished the effect. This is where for me PhysicsEditor came into its own. All I had to do is add one or more images into the editor and for each hit the magic wand button. This would then trace around the shape and I could adjust the tolerances as well as add or remove vertices. I could then apply my density, bounce / restitution, friction etc and repeat for all. Once done I would publish and this would then create a lua file for me to reference against each shape.

-- Get our physics data
physicsdata = (require "myphysicsfile").physicsdata(1.0)
-- Then when creating body call identifier assigned in PhysicsEditor
physics.addBody(actor, physicsData:get("actor")) 

... and thats it. This makes changing physics criteria and verticies incredibly quick, a matter of minutes in fact, by going back to the PhysicsEditor GUI clicking a few things and then publishing overwriting the file.

In addition to my growing arsenal of indie tools is TexturePacker. As mentioned previously I had read on the web that Zwoptex's optimisation of images wasn't as efficient as TexturePacker's and with every KB counting this was quite a draw. The actor for my first game has 250 frames of animation so making sure this was optimised and easy to use was essential. The ability to drag and drop my images and use the saved default optimisation settings makes this a very simple process. Again, with the application set to Corona, an optimised image file (various output formats) as well as a texture mapping lua file makes using this and changing your images etc very very easy to use.

Again, the code is pretty easy to implement:
local sprite = require "sprite"
local sheetData = require "myactor"
local data = sheetData.getSpriteSheetData()
local spriteSheet = sprite.newSpriteSheetFromData("myactor.png", data)

spriteSet = sprite.newSpriteSet(spritesheet, 1, 248)

sprite.add(spriteSet, "do_a_star_jump", 1, 62, 300, 1)
.
.
.

myactor = sprite.newSprite(spriteSet)
myactor.currentFrame = 1
myactor:prepare("do_a_star_jump")
myactor:play()

When modifying my animations and images the only thing I modify is maybe the different spriteset frame counts. All very impressive.

As you can probably tell I would recommend this so why not get a trial or purchase from the store.

At time of writing the prices are TexturePackerPro + PhysicsEditor Bundle for $34.95, with PhysicsEditor only at $19.95 and / or TexturePacker for $24.95.

I think if you are an indie developer like me tools like this make getting games out the door achievable, affordable and ultimately stress free. I don't profess to be an expert using this but what I have been able to get out of both has been very impressive indeed.
Wednesday, 11 January 2012 3 comments

Professional Advice: Imanji Studios

I've been very impressed with the level of co-operation and support from indie developers and established professionals to date who have taken time out to offer little old me some advice.

Keith at Imanji Studios was incredibly impressive in both the speed he came back and the depth of his answers. Some useful advice for all I hope you agree.

For those who don't know if Imanji Studios (and I question which rock you live under) they are responsible for the phenomenally successful Temple Run and the enjoyable Harbour Master.

MyGamingProject: What do you foresee being my single biggest challenge?

Keith @ Imanji Studios: Getting noticed. There are over a hundred thousand companies publishing apps and over a half million apps on the App Store. (source: http://148apps.biz/app-store-metrics/) Everyone has the same goal as you, they want to make a hit app. That's a lot of competition, building a great app is only part of the challenge, you still have to get it noticed.

Also, don't expect your first game to be a hit. The reality is most games fail. It's a very hit driven business you can make 10 games and only 1 of them might be successful. Everyone sees great hits like Angry Birds and Temple Run and thinks they got their overnight. The reality is that most of these companies have been making games for years until they finally come across a big hit. For some interesting stats on how much money the average game makes, check out this blog post. http://www.streamingcolour.com/blog/2011/09/19/the-ios-game-revenue-survey/ The stats are pretty grim, but I think it's a pretty accurate depiction of the the market.

MyGamingProject: What would you have done differently knowing what you know today?

Keith @ Imanji Studios: No regrets really. I'm a firm believer that everything you do in the past shapes and leads you to where you are today. So you have to look at your failures not as something you want to go back and do differently, but as something that will help you get to future success.

MyGamingProject: What game development tools would you recommend?

Keith @ Imanji Studios: There are so many great tools out there. The hardest part is picking the right tool for the right job. Usually I recommend tools that have a good community around them. That way if you get stuck or need help there will be someone there to help. Some great tools in the iOS space especially if you haven't made games before include Cocos2D and Unity.

MyGamingProject: How would you recommend marketing a game, techniques, channels, proposed budget etc?

Keith @ Imanji Studios: We're a big fan of making small pickup and play casual games. We always start with small prototypes and try to find the fun factor before investing a lot of time making things look pretty. We always aim to make games that only take us 3-4 months to make from start to finish to help spread the risk of failure out a bit. Our general rule of thumb is if we can't prototype it and get it to be fun in a week, it will probably take us too long to build the finished product. This doesn't always work out. It's definitely hard to always stick to a firm schedule when you are trying to make something "Fun", but it does help keep our project a more manageable size for our team.

MyGamingProject: What testing process and quality assurance measures do you adhere to?

Keith @ Imanji Studios: We test games ourselves mostly and use beta testers from the community as we get closer to finished.

MyGamingProject: How many people make up Imanji Studios?

Keith @ Imanji Studios: Imangi Studios is 3 people. My wife Natalia and I do all the programming, music, sound effects, and marketing and Kiril does all of our art.

MyGamingProject: Any additional advice you feel would be of benefit

Keith @ Imanji Studios: Attend the big conference like GDC and WWDC. Get to know the press. Get to know folks at Apple. Meet and make friends with other developers. Spend almost as much time thinking about how you are going to market your apps as you do making them.
0 comments

Which mobile platform version to build to?

Now I am getting closer to launching my first game I have always been pretty comfortable in launching to Apple devices as my perception is that most people adopt the latest operating system version.  Android on the other hand is a mine field for me so I did a little bit of digging to know what to build to.

The first challenge I found was just how difficult it was to get information for the Apple devices.  In the end I had to go for a well known app, Bump, to see their distribution of mobile platforms.  Which are broken down as follows:

RankOS VersionCountPercentage
1 5.0.1 25,127 54.42
2 4.3.3 4,273 9.25
3 4.2.1 3,971 8.60
4 4.3.5 3,971 8.23
5 Unknown OS 2,267 4.91
6 5.0.0 2,189 4.74
7 4.1.0 1,297 2.81
8 4.3.2 676 1.46
9 4.3.0 596 1.29
10 4.3.1 552 1.20
11 3.1.3 278 0.60
12 4.3.4 238 0.52
13 4.2.8 149 0.32
14 4.0.0 128 0.28

Stats as of 30 December 2011

So my hunch was pretty right the newer versions are adopted.

As for the Android platform the information is a little more accessible via analysis of the Android Market here. The comparative information is:

Platform Codename API Level Distribution
Android 1.5Cupcake 30.6%
Android 1.6Donut 41.1%
Android 2.1Eclair 78.5%
Android 2.2Froyo 830.4%
Android 2.3 -

Android 2.3.2
Gingerbread 90.6%
Android 2.3.3 -

Android 2.3.7
1054.9%
Android 3.0 Honeycomb 110.1%
Android 3.1121.5%
Android 3.2131.7%
Android 4.0 -

Android 4.0.2
Ice Cream Sandwich140.3%
Android 4.0.3150.3%

Stats as of 3rd January 2012

So between Froyo and Gingerbread this is accounting for over 85% of the market and unlike Apple devices the newer platforms are readily adopted.

So in summary if you are targeting Apple devices go for 4.2.1 and above to maximise your audience and for Android target Froyo and Gingerbread.

Hope this is of some help its certainly focused my efforts
Friday, 6 January 2012 0 comments

Professional Advice: Snappy Touch

Continuing my series on professional developers and studio advice,  Noel Llopis of Snappy Touch very kindly took some time out to answer a few questions.

I'm currently doing some beta testing for Noel, using the excellent TestFlight which I will write a separate blog entry on later, and see some parallels to his setup be it that I am some time and experience behind.

If you don't know Snappy Touch are known for the excellent titles of Flower Garden and Casey Contraption's HD  for iPhone and iPad respectively. I asked:

MyGamingProject: What game development tools would you recommend?

Noel @ SnappyTouch: "I'd say get Unity or Flash or Cocos2D and make a very simple clone just to get the hang on it (don't release it). Maybe start with Pong, and then clone something like Tetris. Then you can start making your own, very simple games. Stick to 2D for a while. Actually, for 2D, just stick to Cocos2D."

MyGamingProject: How would you recommend marketing a game, techniques, channels, proposed budget etc

Noel @ SnappyTouch: "Don't worry about marketing, budgets, and all of that until you've worked through your sucky games first.

My budgets have been minimal, and mostly included my time. When I was confident the game was good (Casey's Contraptions) it was OK to spend some money on sound effects and music, but even so, the whole budget for the game was only $1K."

MyGamingProject: How many people make up SnappyTouch?

Noel @ SnappyTouch: "Snappy Touch is just me [Noel]. But I do collaborations with other people, so Casey's Contraptions was a 50/50 collaboration. Flower Garden was all me with the help of a friend graphic designer who took a small percentage of sales.

MyGamingProject: Any additional advice you feel would be of benefit?

Noel @ SnappyTouch: "learn all you can, make all the games you can, and focus on making the games you're passionate about (not the ones that are making most money).

It's an incredible journey, and I'm having the time of my life. Go for it! :-)"

Some helpful advice and insight I'm sure you will agree.

Casey Contraption's HD can be bought for the iPad for £1.99 and and Flower Garden for the iphone for $1.99
Friday, 30 December 2011 1 comments

Time for reflection

Since I started this project back in October there have certainly been some challenges both related to this and those of my day to day life.

However, as I explained in my initial project kick off there is a goal to all this and setting myself a target of at least 3 hours a day for 6 days a week has certainly given me the impetus to ensure this keeps ticking along.

The more I get involved with Corona SDK by Ansca the more I feel I have made the right decision. Of course I would say that but the more I dig, the support of the community and the 3rd party applications has made this a voyage of discovery.

What I haven't mentioned to date is that I am a reasonably experienced developer having spent some 15 years within the IT industry but probably the last 8 or so have been in management so getting back to my first love of coding and being creative while solving problems is my expertise and this has certainly set me up well on this project.

Reading the game design book The Art of Game Design: A book of lenses was again a better decision than I knew at the time. This taught me to be iterative and thoughtful and not get carried away by shiny new toys as well as consider my audience / customers. That coupled with my over ambition to achieve the next AAA game or Angry Birds rival on first attempt has seen me move from game idea to a simpler game idea a few times to one I am happy to proceed with.

The real proof of this came when I handed my wife the first alpha release of my game (copious amounts of bugs) of which she continually played it over and over for some 20 minutes. The feeling of satisfaction to not only get to grips with the Corona SDK to actually produce something that worked but so a completed non gamer (casual gamer if you like) and interact in how you intended with little instructions is the motivator for the next 200 hours, 1000 hours, hell why not the whole 10000.

The turning point was certainly this week. I was struggling. I had spent an inordinate amount of time getting pretty much no where. I had been using the Corona SDK trial version which is some builds behind the indie license and of course the daily builds. I upgraded to the stable paid version and this was when the light bulb moment happened.

I had been struggling with device performance issues. Like the XCode simulator the Corona one doesn't bottleneck performance relative to a device but instead is happy to consume most of my Mac Book Pro's power to make me think all was well. Compiling to the device pretty much rendered it useless.

I had been using the Director Class by Ricardo Rauber to control scenes while within the trial and while excellent Ansca had released their own supported version called Storyboard. Once I had paid for the indie license the layout of Storyboard just seemed to open my eyes up to how it should all hang together. As a result I have completed rewritten my game with 48 hours, achieving 55 to 60 fps and half way to integrating open feint into the game.

I also found an excellent tool called Physics Editor by Code 'n' Web which has greatly improved my collision detection mapping. A tool that only costs $20, allows you to import your images and then hit auto trace. Output to Corona and you have the physics data you need to provide accurate collision mapping. This alone has saved me hours but given a far greater polish to the experience.

So in summary feeling pretty confident about getting the game out into the app store and android market and the benefit that Corona SDK gives me is that I can target iPad, iPhone, iPod, Android devices, Nook and Amazon Fire with very little to worry about. Also with a greatly improved advertising network which on first sight looks far better than iAd (click rates to be verified) a multi device app should be available early 2012.

And this is good as it brings me back on schedule for releasing 3 games within the first year as part of my project.

It should be a happy new year and I wish you the same
Monday, 19 December 2011 0 comments

Catmull Splines: Object follows path

Following on from my introductory blog on catmull splines I have applied and worked on an example simplifying the excellent Flight Path sample template which can be found here for the Corona SDK framework.

What I was trying to do is understand the equation I put forward an started making it a little more useful to mine (and hopefully your needs)

Right lets look at some code. Only two files here and have tried commenting as much as possible

main.lua
-- This line makes the physics engine features available under the “physics” namespace
require( "physics" )
-- A further file to create a smooth curve when drawing
require( "smoothCurve")

-- ither instantiates or resumes the world. IMPORTANT: it must be called before any of the other functions in this section.
physics.start()
-- ets the x,y components of the global gravity vector, in units of m/s2. The default is ( 0, 9.8 ) to simulate standard
-- Earth gravity, pointing downwards on the y-axis.
physics.setGravity(0,0) 

-- Creates a group in which you can add and remove child display objects. Initially, there are no children in a group. 
-- The local origin is at the parent’s origin; the reference point is initialized to this local origin
local mainGroup = display.newGroup()
local lineGroup = display.newGroup()  mainGroup:insert(lineGroup)
local objectGroup = display.newGroup()  mainGroup:insert(objectGroup)

-- Calculation interval of drawing between the dotted lines
local lineDrawInterval = 50

-- Method called when our object (blue box) is touched
function onObjectTouched(self, event)
--[[
  Touch events are a special kind of hit event. When a user's finger touches the screen, they are starting a sequence of touch events, each with different phases.

  event.name is the string "touch".
  event.x is the x-position in screen coordinates of the touch.
  event.y is the y-position in screen coordinates of the touch.
  event.xStart is the x-position of the touch from the "began" phase of the touch sequence.
  event.yStart is the y-position of the touch from the "began" phase of the touch sequence.
  event.phase is a string identifying where in the touch sequence the event occurred:
   "began" a finger touched the screen.
   "moved" a finger moved on the screen.
   "ended" a finger was lifted from the screen.
   "cancelled" the system cancelled tracking of the touch.

]]
 if(event.phase == "began") then
  -- Determine whether we are to draw a line
  self.allowLineDraw = true
  -- Determine the stype of line output
  self.lineType = "dotted"
  -- Instantiate our table to hold the points
  self.points = {}
  -- Insert our initial touch
  table.insert(self.points, {x = event.x, y = event.y})
  -- Returns a reference to the current stage object, which is the root group for all display objects and groups. 
  -- Currently, Corona has a single stage instance, so this function always returns a reference to the same object
  display.getCurrentStage():setFocus( self )
  -- Set the focus to our object (box)
  self.isFocus = true
 elseif (event.phase == "moved" and self.isFocus == true) then
  -- Make a check to see we have at least one point
  if(#self.points == 0) then
   -- Instantiate our table to hold the points
   self.points = {}
   -- Insert our current position
   table.insert(self.points, {x = self.x, y = self.y})
   table.insert(self.points, {x = event.x, y = event.y})
  end
  -- Determine the distance between our points
  -- math.sqrt: Returns the square root of a value.
  -- math.pow: Returns the result of raising a number to the power of another number.
  local distance = math.sqrt(math.pow(self.points[#self.points].x - event.x, 2) + math.pow(self.points[#self.points].y - event.y, 2))
  -- Insert our current position
  table.insert(self.points, {x = event.x, y = event.y})
  -- If we have set our object to draw a line first check
  if(self.allowLineDraw == true) then 
   -- Draw the line
   drawLine(self) 
   -- Now get our object to follow it 
   followPoints(self)   
   -- Since we have followed it and moved over our control point, remove the lone
   self.allowLineDraw = false
   -- Dependent on our line draw interval recall our method 
   timer.performWithDelay(lineDrawInterval, function(new) self.allowLineDraw = true end)
  end
 elseif(event.phase == "ended") then
  -- Now that we have lifted our touch determined the distance
  local distance = math.sqrt(math.pow(self.points[#self.points].x - event.x, 2) + math.pow(self.points[#self.points].y - event.y, 2))
  -- Returns a reference to the current stage object, which is the root group for all display objects and groups. 
  -- Currently, Corona has a single stage instance, so this function always returns a reference to the same object
  display.getCurrentStage():setFocus(nil)
  -- Remove the focus from our object now
  self.isFocus = false
  -- Follow to the end point
  followPoints(self)  
  -- Show on the stage the line to be solid
  self.lineType = "solid"
  -- Draw it solid rather than dotted
  drawLine(self)
 end
end

function drawLine(box)
 -- Do we have a line already
 if(box.lineGroup ~= nil) then
  -- Make sure we destory anything in memory 
  box.lineGroup:removeSelf()
  box.lineGroup = nil 
 end
 -- Retrieve our point (see other description) i.e. our catmull spline
 local smoothPoints = smoothCurve.getSmoothCurvePoints(box.points)
 -- If we don't have any points then exit now 
 if(smoothPoints == nil) then return end
 
 -- Lets create a new linegroup display object for our box 
 box.lineGroup = display.newGroup()
 --insert this into our linegroup display object on our stage 
 lineGroup:insert(box.lineGroup)

 -- Return modulus dependent on line type
 local modNumber = box.lineType == "dotted" and 2 or 1
 
 -- Iterate through our points
 for i = 0 ,#smoothPoints do
  if(i % modNumber == 0 and smoothPoints[i] ~= nil and smoothPoints[i + 1] ~= nil) then 
   local line = display.newLine(smoothPoints[i].x, smoothPoints[i].y, smoothPoints[i + 1].x, smoothPoints[i + 1].y)
   
   -- Determine line width dependent on modulus
   line.width = modNumber == 1 and 1 or 3
   -- Insert the line into our display object
   box.lineGroup:insert(line)
  end
 end
 -- Return the points now we have them all
 return smoothPoints
 
end 

function followPoints(box)
 -- Check to see if we have any points if not exit
 if(box.points == nil or #box.points == 0) then 
  return 
 end
 -- Get our point to follow
 point = box.points[1]
 -- Get the angle for our box to move
 local angle = math.atan2((box.y - point.y) , (box.x - point.x) ) * (180 / math.pi)
 -- Detemine the x and y velocity to move our object
 local velocityX = math.cos(math.rad(angle)) * 50 * -1
  local velocityY = math.sin(math.rad(angle)) * 50 * -1
 -- Now set the object (box) velocity
 box:setLinearVelocity( velocityX, velocityY)
 -- Initialise our method
 local enterFrameFunction = nil
 local checkForNextPoint
 checkForNextPoint = function(box)
  -- Do we have an object (box)
  if(box ~= nil) then
   -- Get our destination
   local dest = box.dest
   -- Return the velocity we have just set
   local velX, velY = box:getLinearVelocity()
   -- Cbeck a load of stuff
   if( (velX < 0 and box.x < dest.x and velY < 0 and box.y < dest.y) or  (velX > 0 and box.x > dest.x and velY < 0 and box.y < dest.y) or
    (velX > 0 and box.x > dest.x and velY > 0 and box.y > dest.y) or  (velX < 0 and box.x < dest.x and velY > 0 and box.y > dest.y) or #box.points == 0) then
    -- Remove our event listener
    Runtime:removeEventListener("enterFrame", enterFrameFunction)
    -- Remove the point as we have just got to it so not to keep drawing the same one over and over
    table.remove(box.points, 1)
    -- Now draw it
    drawLine(box)
    -- If we have at least another point left then repeat all this again
    if(#box.points > 0) then
     followPoints(box)
    else
     -- If we don't then stop the object (box) waiting for another touch
     box:setLinearVelocity( 0, 0)
    end

   end  
  else
   -- Nothing to do so remove our listener
   Runtime:removeEventListener("enterFrame", enterFrameFunction)
  end
 end
 
 -- Set the box destination to the current point
 box.dest = point
 -- Lets do it all again
 enterFrameFunction = function(event) checkForNextPoint(box) end
 -- Add another listener
 Runtime:addEventListener("enterFrame", enterFrameFunction)

end

-- Lets create our object which is a blue box
local box = display.newImage( "bluesquare.jpeg")
-- Position it roughly top left corner
box.x = 50
box.y = 50
-- Sets its calling method for when the object (box) is touched
box.touch = onObjectTouched
-- Add a listener so it will do something
box:addEventListener("touch", box)
-- Apply physics so that velocity etc will have some effect
physics.addBody(box, "dynamic",  {density = 100, isSensor = true, radius = 40})
-- Now add our local box to the main object display group
objectGroup:insert(box)

and the all important catmull splines magic

smoothCurve.lua
--[[
Creates a module. If there is a table in package.loaded[name], this table is the module. 
Otherwise, if there is a global table t with the given name, this table is the module. 
Otherwise creates a new table t and sets it as the value of the global name and the value of package.loaded[name]. 
This function also initializes t._NAME with the given name, t._M with the module (t itself), 
and t._PACKAGE with the package name (the full module name minus last component; see below). 
Finally, module sets t as the new environment of the current function and the new value of package.loaded[name], so that require returns t.

This function may receive optional options after the module name, where each option is a function to be applied over the module.
]]
module(..., package.seeall)

function getSmoothCurvePoints(points)

 -- Number of points must be at least 3 to calculate the catmull spline
 if(#points < 3) then return nil end
 -- Create our table to hold our points
 local smoothPoints = {}
    -- Steps Per Segment - The Higher The Number - The Smoother The Curve - The Longer It Takes To Calculate
    local curveSteps = 30
    -- First Segment (Remember the complication control points in the introduction blog)
    local firstSegement = drawCatmullSpline( points[1] , points[1] , points[2] , points[3] , curveSteps )
    -- Increment through control points and add it to our table
    for i = 1 , #firstSegement , 1 do
   table.insert(smoothPoints, {x = firstSegement[i].x, y = firstSegement[i].y})
    end
    -- Now increment through our segments inbetween
    for i = 2 , #points - 2 , 1 do
            local middleSegment = drawCatmullSpline( points[i-1] , points[i] , points[i+1] , points[i+2] , curveSteps )
            for i = 2 , #middleSegment , 1 do
               --Add our smoothpoints between our control points
      table.insert(smoothPoints, {x = middleSegment[i].x, y = middleSegment[i].y})
            end
    end
    
    -- Just to finish it all off apply our last segment
    local lastSegment = drawCatmullSpline( points[#points-2] , points[#points-1] , points[#points] , points[#points] , curveSteps )
    for i = 2 , #lastSegment , 1 do
   table.insert(smoothPoints, {x = lastSegment[i].x, y = lastSegment[i].y})
    end
 -- Now return our nice smooty curve
 return smoothPoints
end

function drawCatmullSpline( p0 , p1 , p2 , p3 , steps )
  -- Lets create a table for our points
    local points = {}
 
    for t = 0 , 1 , 1 / steps do
   -- Remember that complicated catmull spline equation in my blog.  Here we use it to work with our control points supplied
            local xPoint = 0.5 * ( ( 2 * p1.x ) + ( p2.x - p0.x ) * t + ( 2 * p0.x - 5 * p1.x + 4 * p2.x - p3.x ) * t * t + ( 3 * p1.x - p0.x - 3 * p2.x + p3.x ) * t * t * t )
            local yPoint = 0.5 * ( ( 2 * p1.y ) + ( p2.y - p0.y ) * t + ( 2 * p0.y - 5 * p1.y + 4 * p2.y - p3.y ) * t * t + ( 3 * p1.y - p0.y - 3 * p2.y + p3.y ) * t * t * t )
            
   -- Now insert these into the our table
            table.insert( points , { x = xPoint , y = yPoint } )
    end
    -- Finished with them all then return our points table
    return points
 
end
Right now we are cooking on gas what is this going to give us. Well here are a series of screenshots to give you a taster but why not give it a go to see what happens.

Now I have an object following a path what I want to implement is a chase and evade AI element to it. I'll post just as soon as I have worked it out.

Stay tuned ...
0 comments

Catmull Splines: An introduction

Those that had followed my project to date have known I have covered a few topics and provided commentary most notably on game design.

Having spent about three weeks on my first game concept I realised I had bitten off a little more than I could chew given my novice status in game design and development. That said which ever route I took there is a physics concept or mathematical gymnastics to perform and there was no getting away from it I was going to have to learn some stuff.

As you may also know I am currently working with the Corona SDK development framework and started looking at the excellent Flight Path sample template which can be viewed here. What I intend to do is write a mini series to document my learnings as well as hope this helps someone else in the future.

For those of you who aren't familiar with the concept of catmull splines (and don't worry I wasn't 72 hours ago), they can be described as splines which are a mathematical means of representing a curve, by specifying a series of points at intervals along the curve and defining a function that allows additional points within an interval to be calculated. There are various functions available to approximate a curve, but in this blog we will focus on a spline known as the catmull spline.

The points that define a spline are known as Control Points. One of the features of the catmull spline is that the specified curve will pass through all of the control points - this is not true of all types of splines.

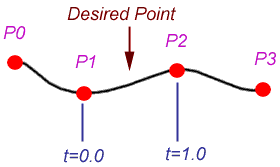
To calculate a point on the curve, two points on either side of the desired point are required, as shown on the left. The point is specified by a value t that signifies the portion of the distance between the two nearest control points.

Given the control points P0, P1, P2, and P3, and the value t, the location of the point can be calculated as (assuming uniform spacing of control points):

q(t) = 0.5 *( (2 * P1) +
(-P0 + P2) * t +
(2*P0 - 5*P1 + 4*P2 - P3) * t2 +
(-P0 + 3*P1- 3*P2 + P3) * t3)

Ermmmm, don't know about you but this is gibberish to me!

While a spline segment is defined using four control points, a spline may have any number of additional control points. This results in a continuous chain of segments, each defined by the two control points that form the endpoints of the segments, plus an additional control point on either side of the endpoints. Thus for a given segment with endpoints Pn and Pn+1, the segment would be calculated using [Pn-1, Pn, Pn+1, Pn+2].

Because a segment requires control points to the outside of the segment endpoints, the segments at the extreme ends of the spline cannot be calculated. Thus, for a spline with control points 1 through N, the minimum segment that can be formulated is P1<->P2, and the maximum segment is PN-3<->PN-2. Thus, to define S segments, S+3 control points are required.

Now what does that all mean to us Corona SDK developers using lua. Well, again, if you have followed my blogs you would know I have hailed the efforts of Matthew Pringle and his Corona Remote app to aid rapid testing. Those who have used it know of the plotting of accelerometer points. Matthew very kindly posted some code on the ansca website which helps put the gibberish above into context. The code is as follows:

display.setStatusBar( display.HiddenStatusBar )
 
-- New Points Table
points = {}
 
-- New Line
local line
 
-- Add Points - Generated Randomly To Draw Jagged Line Across Screen
for i = 1, 11 , 1 do
        
        local xPoint = ( display.contentWidth / 10 ) * i - ( display.contentWidth / 10 )
        local yPoint = math.random( 50 , 250 )
        
        table.insert( points , 1 , { x = xPoint , y = yPoint } )
 
end
 
-- Draw Jagged Line
if ( #points > 2 ) then
        
        line = display.newLine( points[1].x , points[1].y , points[2].x , points[2].y )
        
        for i = 3 , #points , 1 do
        
                line:append( points[i].x , points[i].y )
        
        end 
                        
        line:setColor( 155 , 155 , 155 )
        line.width = 2
 
end
 
-- Catmull Spline Function
function drawCatmullSpline( p0 , p1 , p2 , p3 , steps )
 
        local points = {}
 
        for t = 0 , 1 , 1 / steps do
 
                local xPoint = 0.5 * ( ( 2 * p1.x ) + ( p2.x - p0.x ) * t + ( 2 * p0.x - 5 * p1.x + 4 * p2.x - p3.x ) * t * t + ( 3 * p1.x - p0.x - 3 * p2.x + p3.x ) * t * t * t )
                local yPoint = 0.5 * ( ( 2 * p1.y ) + ( p2.y - p0.y ) * t + ( 2 * p0.y - 5 * p1.y + 4 * p2.y - p3.y ) * t * t + ( 3 * p1.y - p0.y - 3 * p2.y + p3.y ) * t * t * t )
                
                table.insert( points , { x = xPoint , y = yPoint } )
                
                local dot = display.newCircle( xPoint , yPoint , 2 )
                dot:setFillColor( 255 , 0 , 0 )
 
        end
        
        return points
 
end
 
-- Draw Curve Using Catmull Spline Function
if ( #points > 2 ) then
 
        -- Steps Per Segment - The Higher The Number - The Smoother The Curve - The Longer It Takes To Calculate
        local curveSteps = 5
        
        -- First Segment
        local firstSegement = drawCatmullSpline( points[1] , points[1] , points[2] , points[3] , curveSteps )
        
        -- Draw First Segment
        local curve = display.newLine( firstSegement[1].x , firstSegement[1].y , firstSegement[2].x , firstSegement[2].y )
        for i = 3 , #firstSegement , 1 do
                curve:append( firstSegement[i].x , firstSegement[i].y )
        end
        
        -- Segments Inbetween
        for i = 2 , #points - 2 , 1 do
        
                local middleSegment = drawCatmullSpline( points[i-1] , points[i] , points[i+1] , points[i+2] , curveSteps )
                for i = 2 , #middleSegment , 1 do
                        curve:append( middleSegment[i].x , middleSegment[i].y )
                end
        
        end
        
        -- Last Segment
        local lastSegment = drawCatmullSpline( points[#points-2] , points[#points-1] , points[#points] , points[#points] , curveSteps )
        for i = 2 , #lastSegment , 1 do
                curve:append( lastSegment[i].x , lastSegment[i].y )
        end
        
        curve:setColor( 0 , 0 , 255 )
        curve.width = 2
 
end

The results of which put the equation above into something a little more tangible:


Wow that was a lot to take in but hopefully putting it all in one place has helped a little. As I mentioned I am a newbie on this so if anyone reading this thinks what the hell is he talking about this is completely wrong I am more than happy to be corrected just leave a comment.

The next in the series I will look into something more akin to a game and applying the Corona SDK template for novices. Stay tuned ...
 
;